recipes

141 posts

Recipe Saturday: Mushroom Chicken Rice

Ask almost anyone what their favourite food was when they were a child, and chances are, they can give you an immediate answer. Because I love food and am indecisive, my answer would probably be a mixture of foods Momma DS used to make for me- grilled cheese, banana slices in milk for breakfast, Kraft Dinner,  sliced cucumbers soaked in salt and vinegar, Chocolate chip cookies made so many times mom and I no longer needed to look at the recipe… and Mushroom Chicken Rice.

Of all the foods mom made for us, this one has remained both my brother’s and my favourite food that reminds us of our childhood. As well, this recipe is my go-to meal when I want plenty of leftovers for work lunches. (Ok, breakfast too. I love leftovers for breakfast!) Mom’s recipe was simpler than the 0ne I now use, but no less delicious. I’ve modified it over the years through trial and error, before finally settling upon this particular method.

I tend to eye-ball it when making recipes, but I will do my best to break everything down into measurable quantities.

Gonna need lots of Mushroom Soup!

Ingredients:

1 big-ass casserole dish. Mine is big enough to bake a chicken in. I don’t know the actual dimensions.

3 cups of Minute Rice (I never said this was fancy food!)

6 (or so) cans of Campbells Mushroom soup (I’ve tried no name brands, but don’t like the taste. If you have a canned version you prefer over mine, go nuts.)

A package of chicken thighs (6 or so?). My mom used chicken breasts, but I find then too dry for my tastes. Again, if you prefer white meat, feel free to substitute it in.

Salt, Pepper, Cayenne Pepper for a bit of heat.

Oven temperature: 350 or so.

Lets get cooking!

First of  all, I was a dunce and bought chicken thighs with the bone in. If you did too, go ahead and carve those suckers out. 

Next, you’ll want to cook the rice. I usually make about 3 cups of Minute Rice.

(3 cups of rice, 3 cups of water, dash of salt and a little bit of margarine in the water.) I tend to add more rice than water so it comes out  firm- that way, it will absorb some of the mushroom soup while baking. I usually add an extra handful, or about 3/4 cup.

While I am waiting for the rice to absorb it’s water, I cook the chicken. This was the first time I used chicken thighs, and I was pleased with how they turned out. It doesn’t matter if the skins are left on or off. I left them on just to experiment, but to make the dish a bit healthier I would remove them next time. Season the raw meat with a bit of salt n’ pepper, and fry then up in a hot pan greased with a bit of EVOO (Extra Virgin Olive Oil) till they are cooked through. Remove from pan and set side.

To save doing extra dishes, I empty out the cooked rice into the casserole dish I plan to bake the food in, Using the now empty pot, I empty my cans of mushroom soup into it and heat the soup over medium until it starts to become hot and runny, stirring often so the bottom doesn’t burn. I don’t add water or milk because it isn’t necessary, and would only dilute the flavour.  I season the soup-goop mixture with a dash of salt (1/2 a teaspoon maybe?), a bunch of black pepper and a generous shake of cayenne pepper to give the recipe a bit of kick, without being spicy.

Now is the time to add the rice back into the soup. I cook the mixture for a few minutes, just so it’s all mixed together.

I spray my empty baking dish with a light coating of cooking spray, and spoon in a small layer of the rice mixture till the bottom is covered.

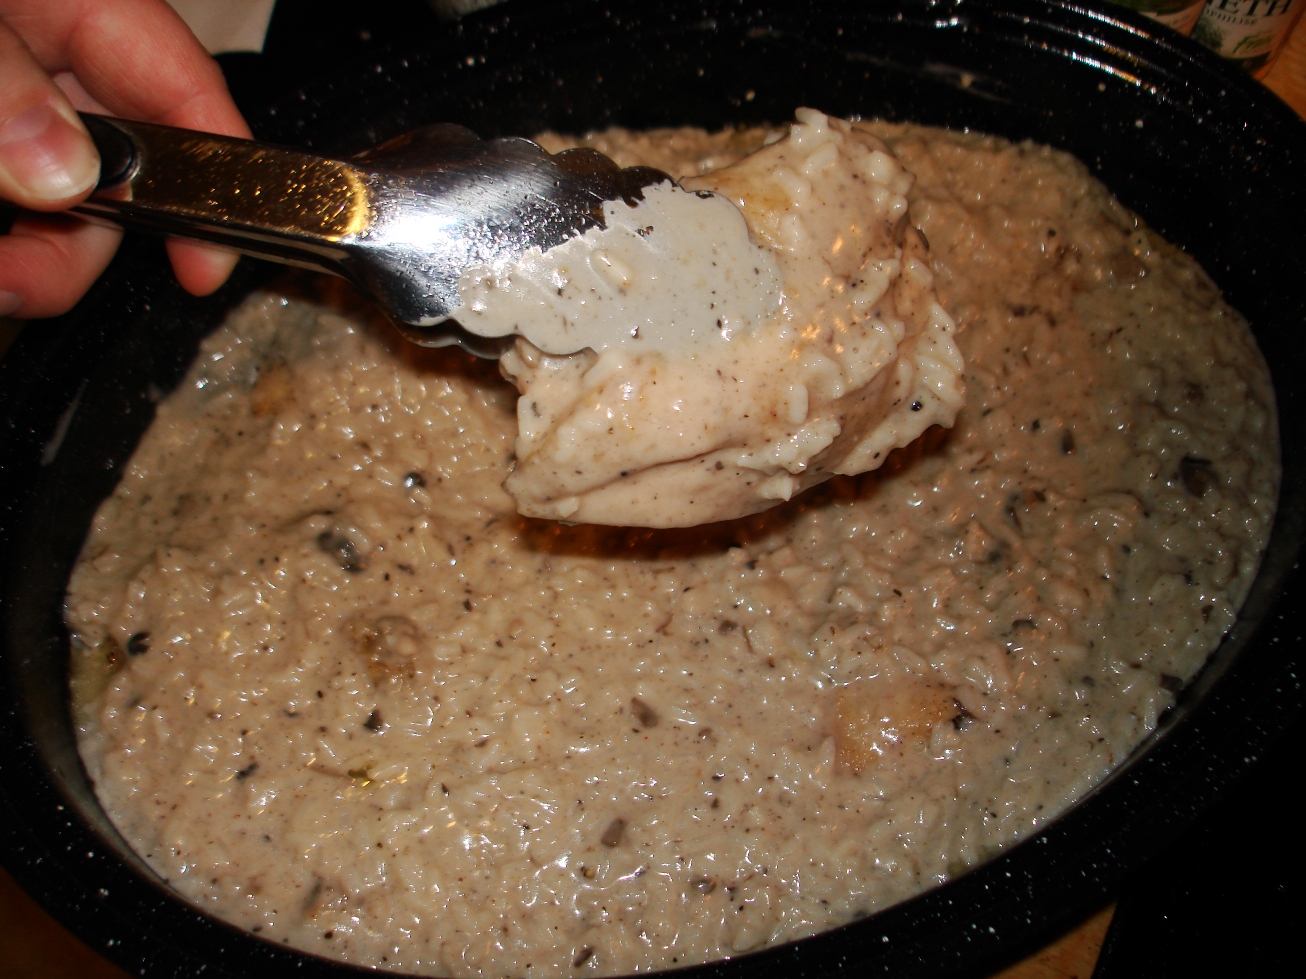
Next, I layer the cooked chicken pieces around the dish, and cover it with the remaining soup/rice mixture. Sometimes I’ll add an extra can of mushroom soup  to the top of the casserole to make it extra delicious- the soup looses some of it’s moisture while baking and turns into a nice, creamy sauce.

I put the cover on the dish and bake it at around 350 F for about 45 minutes- just long enough for

Look at all that pepper!

The rice to absorb some of the soup, but not so long that the edges begin to get crispy and dehydrated. You never want to cook it so long that the layer of soup on top evaporates- that top layer of soup is my favourite part.

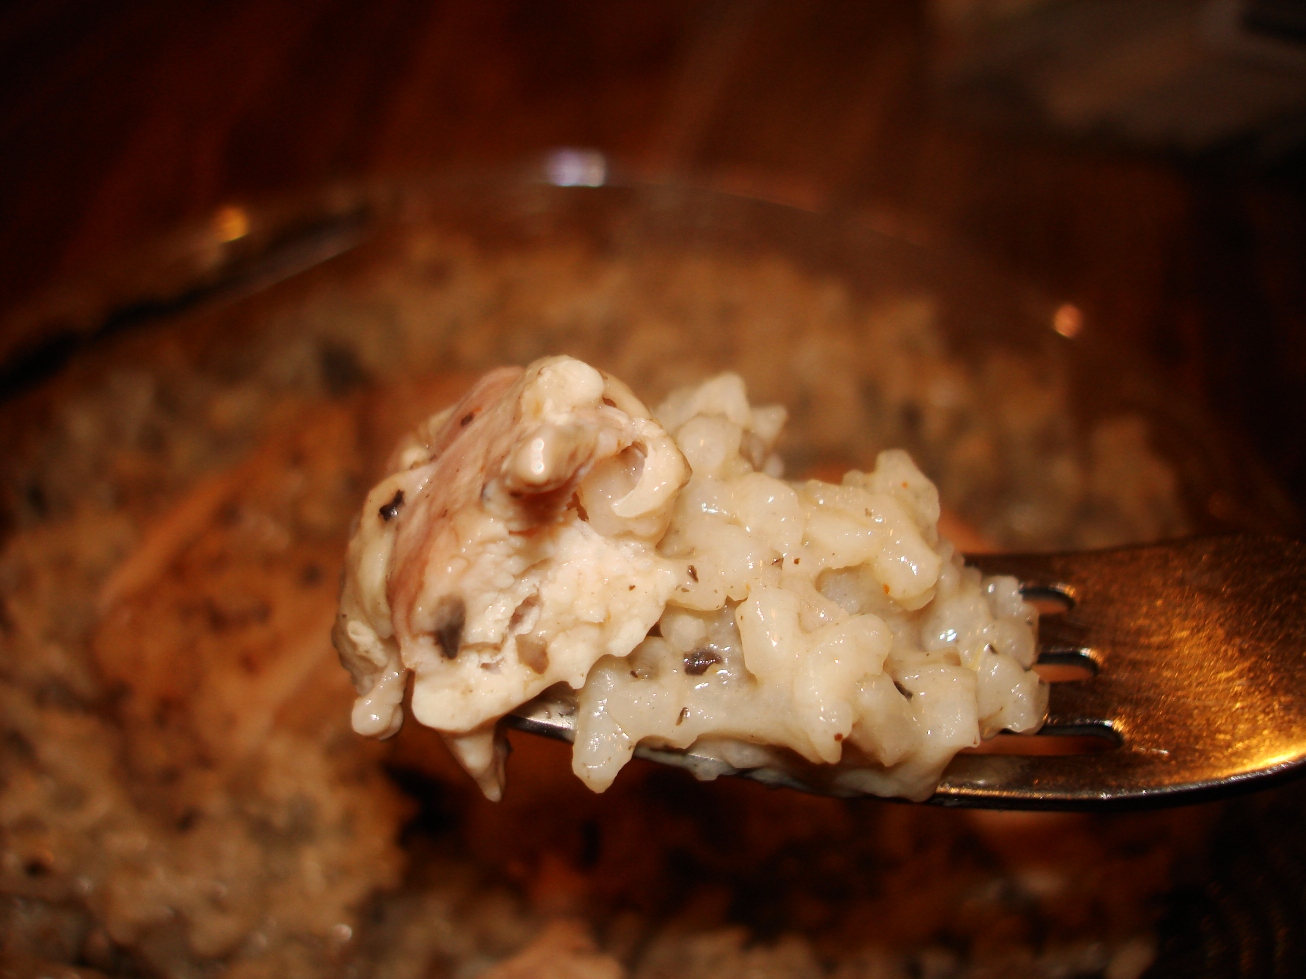
Now it’s time to eat! This dish is so easy to make as a side or vegetarian- just reduce the proportions and leave out the chicken.

Enjoy!


Behind the Scenes of Top Chef: Just Desserts with Chef Erika Davis

This March, Top Chef: Just Desserts‘ Erika Davis led a dessert demonstration for those interested in making the perfect mousse. Today, Erika is the Executive Pastry Chef at the Ponte Vedra Inn and Club and the Ambassador for Callebaut Chocolate. In addition to teaching us how to make a trio of chocolate desserts, she was kind enough to answer questions from the audience about her background, her experience on the Bravo show, and her advice for Season 2 contestants.

Cookie Dough and Kosher Cooking

Erika has been baking since she was knee-high and began decorating cakes when she was 12. She was, of course, a big fan of the Easy Bake Oven – multiple Easy Bake Ovens. “I would blow that joker up just so I could get a new one every Christmas,” she says. She even sold cookies and cakes to her teachers in elementary school. Her chocolate chip walnut cookie, one of the cookies she used to hock to her teachers, was part of the winning team during the bake sale competition on Top Chef: Just Desserts. (Remember Team Pep Squad vs. Team Glee Club?) You can buy the cookie dough that helped crush the glee club like a chocolatey delicious Sue Sylvester at The Ultimate Cooke Dough Company.

After graduating community college for culinary school, Erika got her professional start at several kosher bakeries and restaurants in the Detroit area. Her tip for making a moist parve (non-dairy) cake? Soak it in simple syrup (water and sugar).

Pre-Heat the Oven: The Top Chef Interview Process

When producers called Erika to ask her to apply to the show, she asked if she was being punked. After recomposing herself, Erika gave them her contact information so they could send her the 28-page application. She also had to send them a video demo of her doing something in the kitchen. Next, she was flown to LA for a two-day lock-in in a hotel where participants were only allowed to leave if a show rep came to get them. They were given psych evaluations (a question I’m sure many people have had after watching some Bravo shows). In fact, they met with 3-4 different therapists. According to Erika, the therapists would say “this is who you are and this is your personality” – and totally nail it. Finally, the potential contestants would meet with a couple producers who would decide who moved on to the show.

The Top Chef Challenge

The contestants stayed in LA for 32 days – whether or not they were eliminated early on. When they arrived, they were put in a hotel room and all recipes and personal items were taken and put in a Ziploc bag. Erika thought, “I’ve just been stripped naked!’ because everything that is personal to you is gone.” As a pastry chef, cooking without recipes would also be a major challenge.

The show took care of the contestants the entire time they were there. Erika notes that the downtown LA loft they were put in was not glamorous like the facilities seen on regular Top Chef. Because it was the first season of Just Desserts, they did not have a major sponsor like Whole Foods since no one knew how the show would turn out. Surprisingly, the cooking show contestants weren’t fed the most delectable of culinary cuisine – Erika soon grew sick of grilled chicken and Caesar salad. The schedule was grueling. It isn’t movie magic – The first quickfire really did take place their first day there. The episode where they were challenged to create a chocolate outfit was a 20-hour day. They started around 10:00 pm, worked into the morning, went to bed around 7:00 am, and woke up for the main event at 11:00 am. Once a contestant was eliminated, he didn’t get to go home; he was put up someplace else for the remaining time and worked on voiceovers.

Simmer Down Now

Unsurprisingly, competing on the reality show came with a certain level of stress.

Says Erika:

There was no break [in the competitions], and they do that to see what you can take on stress and see if you’re worthy. . . You gotta be tough. After a while, it’s like, ‘do I wanna be here?’ You start second guessing yourself. Is it worth it? But it was completely worth it because it just showed how strong you were. And it couldn’t have been harder than us just busting our tail in the kitchen at work, but it was constant without proper sleep. You don’t get to sleep in your own bed, you don’t get to see your family. They take everything away from you that’s your comfort, no bible, no books for reading, no computer, no nothing. All you have is yourself and the people you have in the house.

Her way of dealing with the drama? “I stood back and let everybody clown.”

Advice for Season 2

Bravo recently announced that Season 2 of Top Chef: Just Desserts is being cast now.

Erika’s advice for the next batch of contestants?

Be true to yourself. Believe in yourself with your flavors and your talent, and [say] a nice prayer with your family before you go, and know that you have a support group. For me, I was going against myself; I wasn’t going against Seth or Danielle or Morgan. . . I had my own little war, and if you watch the show, you will see everyone had their own little war, but that’s what made the show, that’s what made each character their own personality. Be yourself and know that you are worthy of being on there or else they wouldn’t have put you on there.

Chocolate Chips Pic

Recipe Sunday: The Classic Bloody Mary

Nothing says Sunday like a Bloody Mary. It’s an important part of many brunches and (depending on your Saturday night and the heartiness of your Bloody Mary) can take on the role of a full meal if you’re not careful. There are also few things less classic then a Bloody Mary in a gigantic A&W mug. But I think that the parfait spoon to dig out the olives helps elevate this to near “classic” status.

So, welcome, hung-over Crasstalkers, to a classic Bloody Mary that could substitute for any meal.

Bloody Mary

  • Large glass mug
  • Three ice cubes
  • Many turns of the peppermill (between 10 and 20 depending, on your constitution and preference)
  • Dash celery salt (or fresh diced celery leaves)
  • Several healthy dashes of Tabasco
  • 1/8+ inch Worcester sauce
  • 1/2 fork-full of  horseradish
  • Splash lemon juice
  • 3 olives (these are an important part of your meal, they have a bit of protein, and they’re solid.)
  • Vodka to cover your ice (and a hair more just because, hey, this is a meal)
  • Tomato juice/spicy V-8 to top off the glass

Add a celery stalk, if you want to feel fancy and have a tool to continually stir your ingredients so you don’t just get a mouthful of sludge at the bottom. (Or in case you are so hung over that you need to check your reflexes by stirring your drink, and patting yourself on the head simultaneously.)

Clearly, these are just rough guidelines. The idea is, don’t be afraid of your Sunday morning and if this doesn’t put hair on your Misters or your “Little Suzy”, then you’re not doing it right. But remember, practice makes perfect.

Especially on a Sunday.

Recipe Sunday: Prosciutto, Dill and Cheddar Popovers

When we first started our cooking blog, one of the first posts was about popovers. At the time I was convinced that cold-oven popovers were the best choice over popovers made in a preheated oven. The science made sense (cold batter brought slowly to a very hot temperature would create steam to make them pop) and to be honest, I had only eaten/made cold-oven popovers. And my husband and I loved them, and the cats vied for scraps.

But, with the new year, a sad thing has recently happened to our oven; It takes forever to heat up now and recent attempts at making popovers have been a gooey mess without a crisp crust, or any height.

So, I decided to make popovers in a hot oven and … wow.

What a difference starting off at 400 degrees can make.

Here is the photo that accompanied the cold oven method. They had popped, but they weren’t killing themselves being overly ambitious.

And here is a close-up photo of a popovers using the hot oven method.

All six of them  looked like Tomoyuki Tanaka movie monsters.

And their height and airiness was even more surprising considering the fact that they had prosciutto, dill and cheddar in the batter.

Prosciutto, Dill and Cheddar Popovers (Hot Oven Method)

  • 1 cup of milk (warmed in the microwave for 45 seconds)
  • 1 cup of flour
  • 2 eggs
  • 3 tablespoons finely chopped dill
  • ¾ cup of shredded cheddar cheese
  • 2 slices of finely diced prosciutto
  • 1 teaspoon of salt and 1 teaspoon of black pepper
  • 2 tablespoons of butter, melted

Preheat oven to 400 degrees.

Pan fry the prosciutto in olive or grapeseed oil until brown and crisp.

With a pastry brush use the melted butter to grease the muffin tin cups, and place the pan in the oven for a couple of minutes until the butter is sizzling.

Add salt, pepper, cheese, prosciutto, flour and eggs to the warmed milk.

Take the pan out of the oven and drizzle the rest of the melted butter into the bottom of the tins. Pour the popover batter into the tins until they are approximately 1/2 to 3/4 full.

Place the muffin tin into the hot oven and tiptoe away from the stove for 35-40 minutes. (Even if they aren’t done at 35 minutes, they won’t collapse if you take a peek and decide they need to brown a little bit more.)


Happy Recipe Sunday. Let’s talk about food.

Recipe Sunday: Sour Cream Pancakes

While staying at the Peabody Hotel recently, I was introduced to the best pancakes ever (sorry Alton Brown): sour cream pancakes. The consistency is hard to explain, they are dense and fluffy at the same time. I have been thinking about these pancakes for a long time, and decided to look up a recipe. The always awesome Ina Garten had a great Banana Sour Cream Pancakes recipe that I decided to tool around with. I am including my version in case you are feeling adventurous this weekend.

Ingredients:

  • 3/4 cup unbleached flour
  • 1 1/2 tablespoons brown sugar
  • 1 teaspoon baking powder
  • pinch of Kosher salt
  • 1/4 cup sour cream
  • 1/3 cup plus a tablespoon vanilla almond milk
  • 1 egg
  • 1 teaspoon vanilla extract
  • a splash of lemon juice
  • stick of butter for the griddle

Preheat the electric griddle to 350F. Mix all the dry ingredients together in a large bowl. In a separate bowl, mix the wet ingredients thoroughly. Add the wet ingredients to the dry ingredients and mix until the dry ingredients are incorporated, but don’t over-beat the mixture. Once the griddle is hot, coat with butter and use a paper towel to wipe the griddle down. Scoop a large spoonful of the mixture (which will be considerably thicker than regular pancake batter) onto the griddle. Turn the pancakes when bubbles form on the top surface and the edges set. Cook pancakes until bottom side is light golden brown. Serve with real maple syrup.

Tips: you can substitute regular milk for vanilla almond milk. Also, if you like your pancakes thinner you can add more milk. If you want to add chocolate chips (a staple in our house), add them to the batter right before you pour it onto the griddle.

Making Homemade Ricotta and then Italian Bread With The Whey

This fall I stumbled on a recipe for homemade ricotta. I had no idea that making ricotta was even an option in an apartment kitchen, let alone a kitchen that can barely fit two people standing side-by-side. But there it was – an incredibly easy ricotta recipe on Epicurious. And, in the comments following the recipe, a woman talked about making bread from the whey left over from making the ricotta. Holy shit.

Homemade Ricotta (via Epicurious)

2 quarts whole milk

1 cup heavy cream

1/2 teaspoon salt

3 tablespoons fresh lemon juice

Very slowly bring the milk, cream and salt to a boil on moderate heat and stir occasionally to keep it from burning. Then lower the heat, add the lemon juice, stir it constantly and watch it curdle.


At this point you will think, “Wow, what a mess. This was a tragic waste of time.”

But, continue on anyway. Line a colander with the cheesecloth, and place it over the bowl. Slowly dump the curdled mess into the colander.

Let it sit for an hour. Then you will be in awe of yourself. You will pat yourself on the back while simultaneously calling your friends, co-workers, parents, ex or current lovers, your veterinarian, and your old college roommate.

You just made homemade ricotta!

And not just any homemade ricotta, you will have made the best ricotta that you have ever tasted. Slightly lemony, thick and soft, ricotta. (See top photo.)

Take a bow, and then get back to work – because collected in the bowl is a lot of whey, and you’re going to make 3 loaves of incredible Italian bread with it. (Recipe via Eating Small Potatoes with a few tweaks)

Homemade Italian Bread

5 cups all-purpose flour
2 tsp. salt
1 tbl. sugar
4 1/2 tsp. yeast

3/4 hot whey
1 cup warm water
5 tbls. melted butter

Additional ingredients (to your preference) are cornmeal and sesame seeds.

Add dry ingredients to the bowl and stir.
2. Heat the whey and water in a saucepan. Pour butter into the whey/water mixture.
3. Add the liquid ingredients to the dry ingredients. Stir well until combined. (At least 5 minutes.)
4. Divide dough into 3 loaves. Pat the dough into a rectangle and then roll up into a cylinder. Pinch seams and edges, then shape.
5. Place the loaves onto a sheet pan sprinkled with cornmeal. Cover and rise in a warm place for 1 hour.
6. Paint the loaf with egg white and sprinkle with sesame seeds.
7. Bake at 425F for 30 minutes.

Amaze your friends and astound your enemies with your culinary prowess.

And leave your own recipes, because after all,  it’s Recipe Sunday where we are all about food.

(Booze) Recipe Friday

Since the weekend is upon us it is time to start thinking about ways to waste our time before getting back to work on Monday. Hopefully, you did not have too much green beer yesterday and are ready for some weekend libation. Today I am sharing a recipe from my friend Kelly, who understands the importance of a proper drink. First, here is a recipe for a delicious Lime Ricky that she makes. This recipe originally appeared on food52.com.

A woman who appreciates a good drink.

What you need:
12 ounces frozen red raspberries
1.5 cups sugar
Zest of two limes
Juice of two limes
24 ounces Sparkling water
Thin slices of lime for garnish
What you do:
Combine raspberries, sugar and zest in a saucepan and place over medium heat. Bring the mixture to a boil, stirring constantly until the berries dissolve and the sugar melts. Only let it boil for 2-3 minutes as you don’t want jam. After that time, take the syrup off the heat and let cool slightly. Strain the syrup.
Fill a tall glass by half with ice. Pour 3 to 4 tablespoons of the syrup over the ice. Squeeze the juice of half a lime into the glass. Fill the glass to the top with sparkling water and garnish with a lime slice or two. These are super tasty, and are a nice drink when you feel like something sweet.

Kelly also has a beer blog (told you she was cool), and her beer recommendation for this week is Founders Red from the Founders Brewery in Grand Rapids, Michigan. They make really tasty beer so grab some of this if you can find it.

So what’s on you booze agenda this weekend, Crasstalkers? Share your recipes below.

Recipe Sunday Thursday: Irish Soda Bread

On this day of binge-drinking and misguided attempts to show off your jigging skills, here’s an easy-to-make and delicious recipe for Irish Soda Bread. Soda breads use baking soda instead of yeast as a leavening agent, and as far as we know, were first introduced to Ireland in the 1840s. Irish soda bread traditionally has a cross cut into the top before baking, which may help it to rise and/or keep away the devil. You can do other designs though; whatever tilts your tea kettle!

The somewhat surprisingly irate people over at The Society for the Preservation of Irish Soda Bread contend that there is only one “true” form of Irish soda bread, and any additional ingredients are an abomination to the bread and humanity (actually only a slight exaggeration). Nevertheless, if you want to add raisins, nuts, gummi bears, or even some green food dye to your soda bread, I say go for it.

The following recipe is from The Joy of Vegan Baking, by Colleen Patrick-Goudreau. The milk and butter in the recipe can obviously be either vegan or not.

Ingredients

  • 2 cups (470 ml) milk
  • 2 teaspoons white distilled vinegar
  • 4 cups (500g) flour (can be whole wheat, white, or a mixture of both)
  • 1 teaspoon baking soda
  • 1 teaspoon salt
  • 1/4 cup butter, melted

Preheat the oven to 425ºF (220ºC). Lightly grease a round 9- or 10-inch cake pan [I just used a cookie sheet and it worked out fine]. In a small bowl, combine the milk and vinegar. Let stand for 5-10 minutes.

Mmmm, dough

In a large bowl, mix together the flour, baking soda, and salt. Add the milk and vinegar mixture and the butter, and combine until you have a sticky dough. Knead the dough in the bowl or on a floured surface for 10 to 12 strokes [Err on the side of handling the dough less].

Place the dough in the pan, and cut a cross [or smiley face] in the top. Bake for 40-45 minutes, or until the bottom has a hollow sound when thumped. Cool slightly before smoothing.

Soda bread is delicious when toasted lightly and buttered, or dunked in some soup or sauce. Enjoy!

Recipe Sunday: Chipotle Chicken With Cumin Cream Sauce

Our anniversary was last week, and to celebrate we walked around Burlington and then we went out to dinner.

It was an amazing dinner. In fact it was so good, that I intentionally left about half of it on my plate to bring home for dinner the next night. But, the restaurant was busy, we had shopping bags in the booth with us, and it took us a while to pile on our layers of winter attire. As a consequence, I didn’t realize that I had left my doggie bag on the restaurant table until we were half-an-hour away.

I’m not going to lie, I was irrationally annoyed.

And I know that, “Something, something, something, is the chipotle chicken of invention.” So I decided to try to recreate the dish.

Chipolte chicken with cumin cream sauce

  • 4 chicken breasts
  • 1 tablespoon of chipotle powder
  • 1 tablespoon of ancho chili powder
  • 1 tablespoon of hot smoked paprika powder
  • 2 teaspoons of cayenne powder

Mix the spices together on a plate.

Cumin cream sauce

  • 1 large diced red onion
  • 1 large sliced shallot
  • 3/4 cup of white wine
  • 1/3 cup of half and half
  • 3 teaspoons cumin

Rub the chicken breasts with olive oil on both sides, and coat the breasts on both sides with the spice mixture.

Grill both sides of the chicken until done and tent the with foil to keep warm.

For the cumin sauce: In a small saucepan saute the sliced shallot and diced onion in olive oil. When the onions and shallots are soft, add the white wine and remove from heat. Stir in the cumin and, when the sauce has cooled for approximately 5 minutes, turn the heat on low and slowly add the half and half. (Letting the sauce cool for a few minutes will keep the sauce from breaking. (Or it least it helped quell my paranoia about the sauce breaking.)

Slice chicken and serve on top of Spanish rice with the cumin sauce drizzled on top.

Recipe Sunday: Quick and Easy Greek Salad

Disclaimer: this salad will give you dragon breath for the rest of the day (or the morning after if you choose to have it for dinner). It is still delicious. Feel free to chop the ingredients to whatever size you prefer.

Greek Salad
Prep time: 10 minutes
Serves two

Ingredients
2 plum tomatoes, chopped into large chunks
1/2 cucumber, sliced thick
1 green pepper, chopped
1/4 white onion, sliced
black olives, can be whole or sliced
crumbled Feta (as much or as little as you want)
1/4 cup olive oil
juice of 1 lemon (or 3 tablespoons lemon juice)
1/2 tablespoon dried oregano
salt and pepper to taste

Directions
Combine vegetables in a large bowl. In a small bowl, combine olive oil, lemon juice, oregano, salt, and pepper. Whisk to form dressing. Pour dressing over vegetables and mix together five minutes before serving. Top with lots (or a little) feta cheese, and serve with warm pita or flatbread. If you want, you can add sliced grilled chicken and make a larger meal out of it.

Share your favorite recipes in the comments!

Photo courtesy of Lori_NY