 Food photography is a pretty insidious hobby. It starts off innocently enough – you’ve just made a beautiful fruit salad with ingredients you received from friends, and you want to send them a photo of the finished product. Or you’ve just purchased a bounty of fresh vegetables at the farmer’s market and you want a photograph to remind you what gorgeous vegetables look like when everything in the winter produce aisle is dull and limp. Or maybe you are thinking about starting to take pictures of food. Where do you start?
In a perfect world (in other words, if you can afford it) what you really should have for food photography is a digital SLR (single lens reflex) camera, which gives you more control and allows you to swap different lenses in and out. Used camera bodies start at a couple of hundred dollars and it’s worth the money if food photography is your hobby. My husband spent about $400.00 on my camera body and lenses for my Christmas and birthday presents. I’m not expecting or craving another gift until at least 2015.
The main thing you want in a camera is control, particularly ISO/ASA and exposure settings. Get out your manual and familiarize yourself with the basics and don’t just rely on your camera’s auto settings. Also, a zoom lens is a necessity for shooting food. That might sound hyperbolic, but you want to play with different angles. Also, you want some distance from hot food. The last thing you want to do is shoot a close up with a fixed focal lens, 4 inches away from a pan of frying chicken or a pot of boiling soup.
ISO settings
Here’s a basic primer on ISO settings. The ISO setting is for you to tell the camera how sensitive it should be to light. The lower the number, the finer the grain and sharper the image. Set your ISO to the lowest setting that will allow you to shoot without a flash. You don’t want a flash. For the same reason, don’t leave your camera in the “auto” setting because in this setting, your camera is making decisions for you and they’re often bad decisions. In a situation where you could still get away with 400-800 ISO the camera could go to automatic flash mode. Flash = flat food photography.
- 100 ISO – extremely bright light
- 200 ISO – still bright light, but it could be brighter
- 400 ISO – the light is still good, but it is starting to fade
- 800 ISO – the light is better than dim
- 1600 ISO – only if you’re desperate
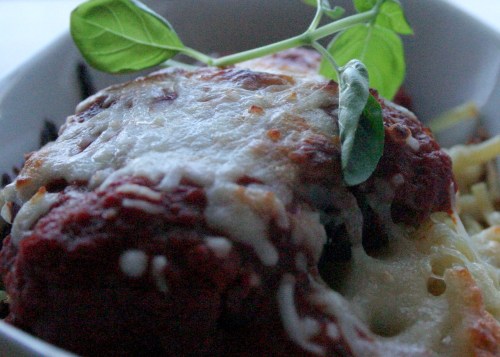
Chicken parmesan shot at 1600
Try to only shoot food in daylight
Even with a daylight balanced photo lamp, food looks washed out. Sure, you can get a decent photo, but it’s nearly impossible to get a vibrant photo. The photo below isn’t bad, but as you can see, the color is muted.
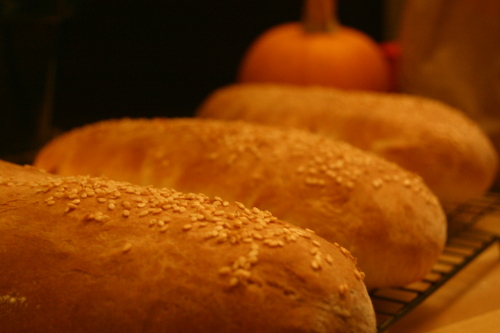
Compare that to bread in daylight.
Living in an apartment with limited window light makes food photography a challenge. But, I’ve started to follow the lead of my pets. Cats follow the sun from window to window and I shamelessly follow their example. I’ve photographed vegetables on our fire escape, an artichoke salad in our bedroom window, and scalloped potatoes in my husband’s music room.
Be imaginative
If you have a house, photograph your food on a porch or deck. Instead of photographing food in your kitchen before a gathering, bring your camera to the cookout where it’s going to be eaten. Anywhere there is daylight and a flat surface – you have a photography studio.
Always have something white in the frame
My husband was a newspaper photographer for close to a decade, and he translates that experience into excellent photography tips. A few months ago he was looking over photos that I had taken for our blog and he noted that there was no white in the photo. A photo that doesn’t have the full range from black to white tends to look flat and underexposed.
He’s right. Even if it’s the corner of a white napkin in the photo, you want white for color balance.
Oil is your enemy
Not because of your waistline (although there is that) but because even in a low light situation a dish with oil will try to get blown out. (Vinaigrettes can particularly tricky.) The camera loves to focus on an oil sheen, because it’s bright. So, that will leave your photo a little out of focus and looking vaguely “soft” if you’re not careful. Unless it’s a delightfully cloudy day, you will want to photograph any food with oil directly above the plate. That minimizes the sheen.
Oil is your enemy part 2
A tremendous amount of food is oily. Soup stock, chili and stews tend to have little pools of oil on top of them and it’s really unappetizing. This is where lettuce is your friend. Take a piece of lettuce and skim the surface of a greasy looking liquid, it will sop up the oil.
Keep your dishes clean
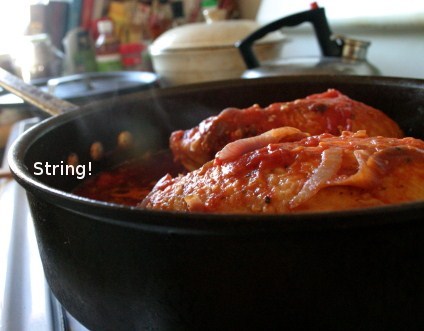
Right now you’re probably thinking, “Ahem. I have a clean kitchen,” and I’m sure you do. But, a piece of something as small as string can ruin a photo. I took over fifty photos of this chicken cattiatore in a row trying to capture steam.
The light was perfect, the dish looked good, and I overshot on the assumption that I would get something. Well, I did. I got a little piece of white dishtowel string hanging off the pan which was stupidly annoying. If I cropped it out, the composition of the photo would look off. And because I don’t use Photoshop (or similar programs) to alter my photos, I was back at square one but with less light and the dish looking less attractive than it had before. So wipe down any pan/dish/bowl that you are going to photograph. A random crumb, a teeny piece of paper towel or anything you didn’t intentionally place on the plate, can distract from the food.
Don’t eat yet!
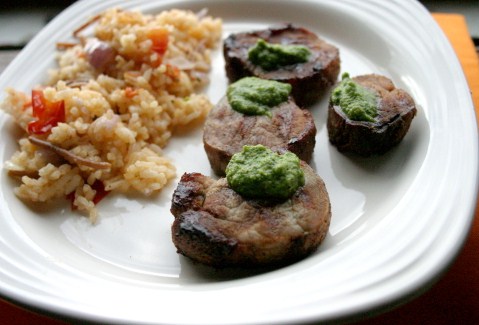
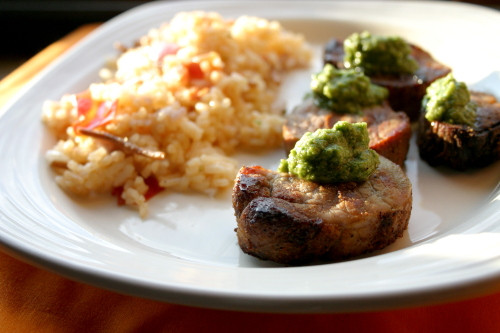
You’ve shot your carefully plated dish, but it was overcast, and your not happy with the photo. Don’t give into hunger. “Eh, I might as well eat it.” Put your plated dish in the fridge and…wait. One afternoon in July, I spent over two hours making grilled pork, Spanish rice-pilaf and cilantro pesto. But the day was a little gray and I shot (and shot) hoping to capture the vibrant orange of the rice and the green of the pesto, but it was just…blah. I was hungry and aggravated, but I pseudo-optimistically put the plate in the refrigerator and then ate some peanuts to stave off my hunger. Then a quick sunbeam burst through the clouds. I grabbed the dish, wiped the condensation off the plate and added more pesto to the faded dollops on the pork.
I was tickled by the difference between the two photos.
There’s nothing wrong with a little obsession
Reading these tips I realize that I sound like a crazy person. “Over 50 photos of chicken cattiatore…” But, food photography is a pretty obsessive hobby. And I haven’t even talked about all of the cooking and clean-up that has to happen just for one photo. Also, the diminishing light in fall and winter means that I’m back to making entrees for dinner in the morning, so that I can photograph them at noon when the light is the strongest.
But, once you have the food photography bug you will be amazed at how challenging and fun it is. And if you haven’t tried it, it’s about as much fun as a person can have while sober or while wearing pants.
