After three years working overseas with no opportunity for biking or other healthier forms of commuting, I was looking forward to breaking out my old Trek bicycle and using it to get around town this summer. The Trek was originally purchased in the mid-nineties following my move into condo-style housing built by my college several miles off main campus. Winters can be brutal in rural upstate New York – walking back and forth was clearly not an option, and public transportation was non-existent in a town without so much as a stop light. I asked for a car, but got a bike.
Fast forward to the present, and it was time to get the bike out and start riding it again after several years sitting in storage. Riding a bike is like, well, learning to ride a bike. You never really do forget how to do it, but among the kinks to be worked out (aside from some very sore sitting bones for the first week) was not being able to carry anything with me. If I was to make this thing useful for running errands and other day to day purposes, I needed to seriously increase its carrying capacity. This post details how I did that (and, hopefully, helps you avoid some of the struggles I ran into during the process).
TO THE INTERNET!
While overseas, I stumbled across some really clever guides for converting kitty litter buckets to panniers for a bicycle over at Instructables.com, so I set about reading through the various guides to pick and choose the ideas that seemed best to me. I borrowed heavily from this guide, if you’d like to check it out for yourself, and ended with some small modifications to make the bucket panniers work for my particular situation.
Getting Started
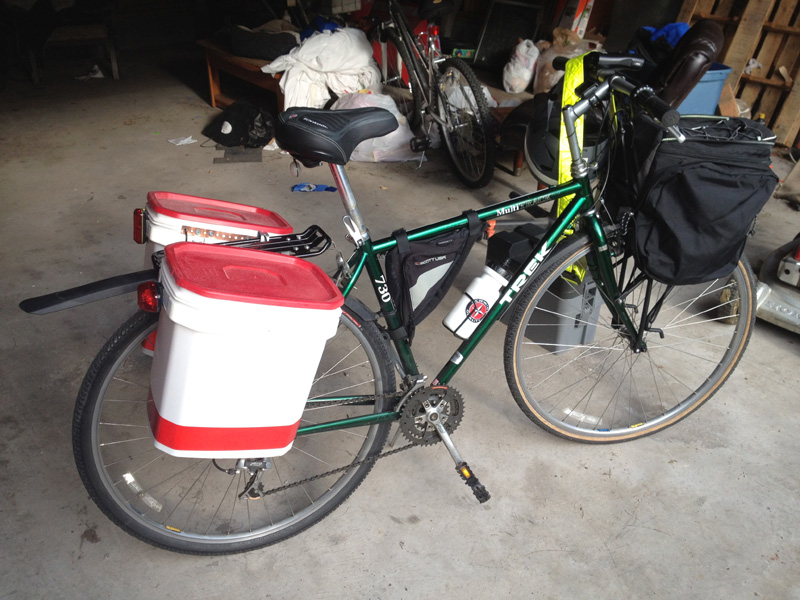
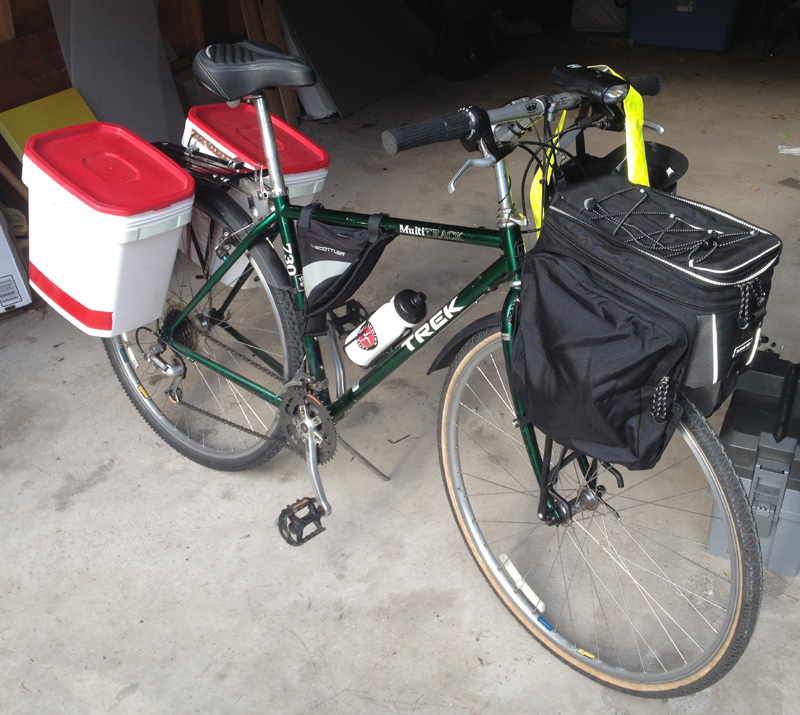
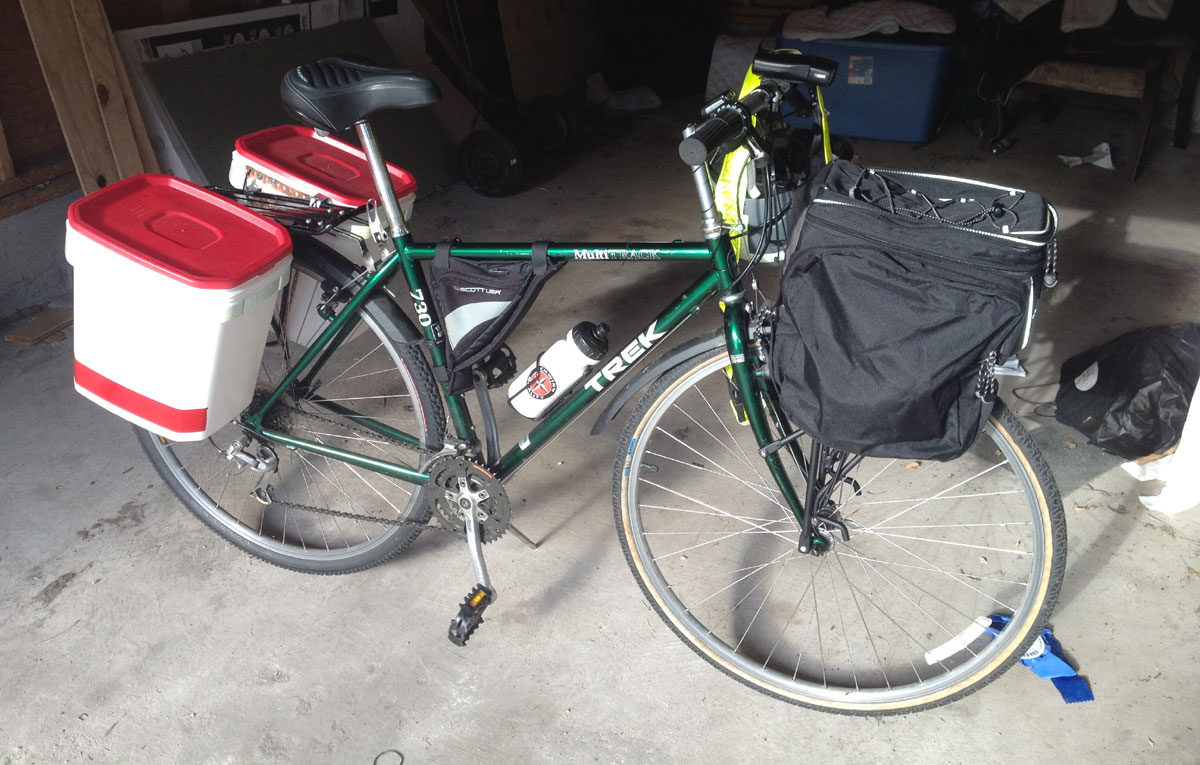
 I started with the aforementioned basic Trek hybrid bicycle with a rear rack and a Trek canvas carrier bag with collapsible panniers on the back (similar to this design, but an older model). The carrier bag was a nice piece of gear for carrying a basic complement of tools, bike chain, and some other small items, but it was not nearly enough capacity for grocery shopping or other errands. Regardless, I hated to lose it so I ordered a Blackburn MTF-1
 bike rack from Bike.com for about $40, the idea being to transfer the Trek carrier bag from the rear rack to the front.
(Consumer review note: Bike.com had the lowest price online, but the rack was on back order without any notification from their website listing, and it continued to be listed as in-stock the entire time I was waiting for it to ship. Caveat emptor.) I chose the MTF-1 rack because it appeared to match up with the existing mounting holes I had on my front fork, no other reason.
Procuring The Parts
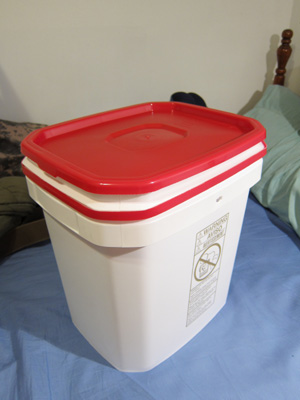 I don’t have cats, so where to get the kitty litter buckets? I asked around with friends and family with cats if they had any old kitty litter buckets I could have for free, but no luck. I did a simple Google search for “square buckets” and ended up going with U.S. Plastic.com. They carry a variety of bucket shapes and sizes, and I settled on two of their 4.5 gallon buckets for $20 including shipping. I chose this particular bucket because, 1) it was a narrower rectangular shape rather than square shaped (I was concerned with wind drag if the buckets stuck out too far), 2) it offered slightly more capacity than standard kitty litter buckets, which are generally 4 gallon capacity, and 3) it came with a “smart hinge” lid which looked promising (more on the lid design below).
If you’re concerned about aesthetics, this Instructable guide points out that color matched 4 gallon buckets can also be found online. I, for one, was not concerned so I stuck with a standard white bucket to keep things simple. Also, do be mindful of your bike’s dimensions when ordering buckets. I almost ordered 5 gallon buckets but found they were tall enough that they would have interfered with my bike’s rear gear mechanism once mounted to the rear rack.
Mounting Hardware
Once you’ve procured your buckets, here’s what you’ll need to mount them:
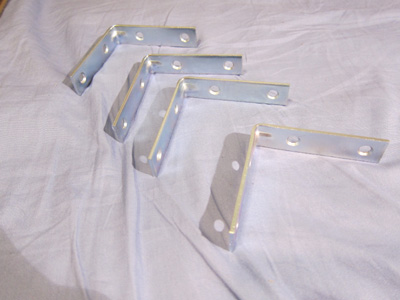
 Some sort of hook for attaching to the rack. I bought 2″ L-brackets and simply bent them into shape, but you can buy pre-fab pannier hooks if you want to be all fancy.
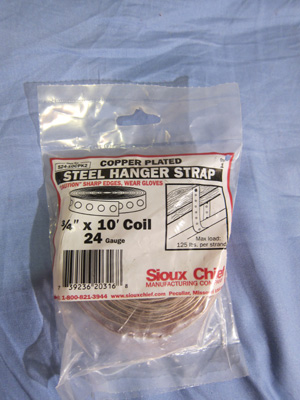
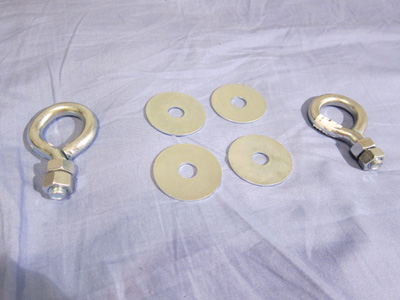
- Pipe strapping. The strapping will be used to reinforce the points where the hooks are mounted to the buckets. I bought copper strapping to avoid rusting.
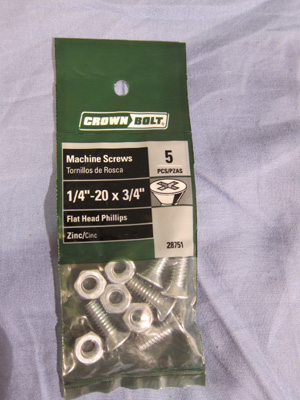
- 24 nuts/bolts. Twenty four is probably overkill, but I decided to err on the side of over-engineering this job. Double check that the screws are the correct gauge to fit properly through the holes in the strapping and your hooks.
- 2 eye bolts, associated nuts & washers. These will be used to secure the buckets to the bike laterally.
- 2 Bungee cords. For securing the panniers laterally to the bike rack through the eye bolts. You don’t want the panniers rattling around behind you every time you hit a bump in the road.
All told, the hardware for the entire project (to include extra hardware I had to buy to mount the front bike rack when it finally arrived – not bitter at all Bike.com, not bitter at all) totaled about $25.
Tools Used
Tools are always an individual preference, but here’s a starting list of tools you’ll want to consider having on hand:
- Drill & bits: You don’t need a heavy duty drill or particularly nice drill bits. After all, you’re just drilling holes in plastic. Do make sure that you have a bit sized properly for the screws you’ll be using to attach the hooks to the buckets. You want the holes to be just a hair smaller than the screws you’ve chosen.
- Exacto Knife(s): Depending on the design of your buckets, you may be doing some trimming to make space for the hooks. I happened to have an Exacto knife kit with different shaped blades, and I found the different shapes helpful for getting at tough angles. YMMV.
- Wrenches & Screwdrivers: Sized appropriately for the mounting hardware you’ve purchased. My only word of advice here: don’t skimp on the screwdriver. There is nothing worse than trying to turn screws with a shitty screwdriver.
- Heavy duty wire cutters: For cutting the pipe strapping to size.
- Pliers & Hammer: For bending the L-brackets into hooks.
- Sharpie
- Tape Measure
Starting The Build
 Step 1) Measure out your buckets, and cut the pipe strapping to size. You’ll need 8 total pieces of strapping. I recommend you cut the strapping as you need it, so that you have the flexibility to modify your approach as you go. My Instructables guide specified measuring out strapping 8 holes long, and that happened to be what worked for me too. At the end of the day, what you’re really going for is enough strapping to brace the hook and a screw on either side of the hook, the purpose being to distribute the forces from carrying cargo as widely as possibly to avoid over stressing the mounting points.
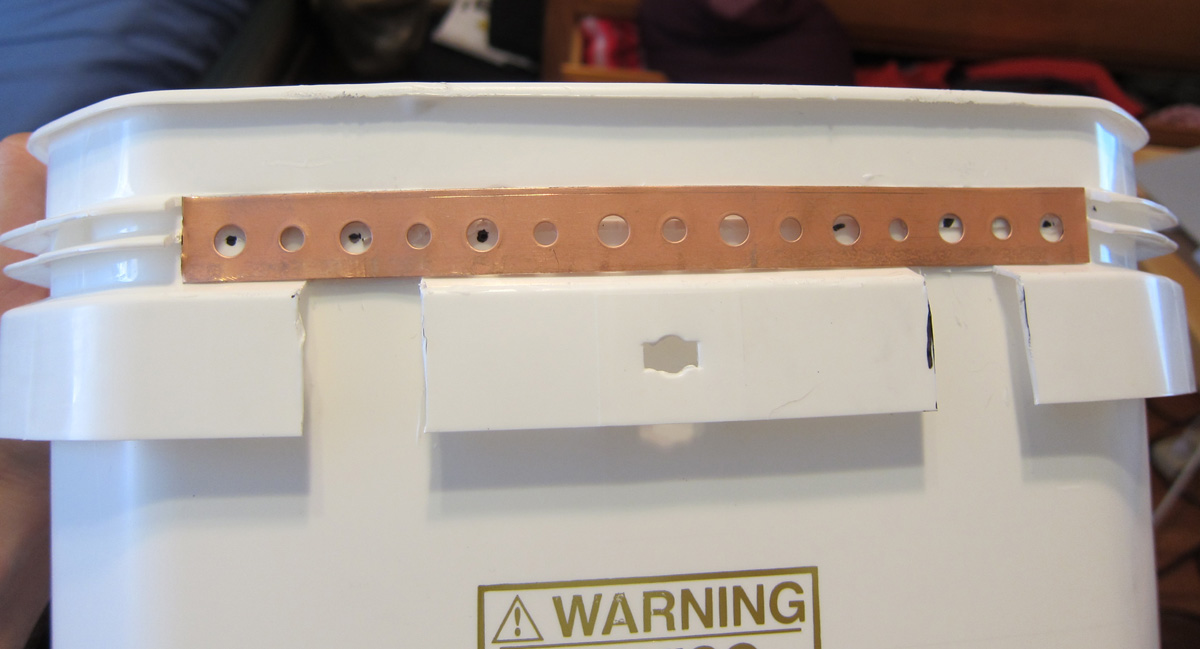
Take the first piece of strapping and a hook, and mark the area where you want to mount the hooks. Trim any plastic flanges or edges from the bucket with your Exacto knife as needed to make space for the strapping & hooks to mount flush to the bucket. Once you’ve cleared all the excess plastic away, mark your drill holes.
I found the planning, measuring, and trimming to be the longest step in the entire process. Take your time! Put on a good podcast, get yourself a beer, and hunker down to make sure you know exactly where you want to mount everything. Once you cut it off or drill it out, there’s no putting it back if you change your mind. More on planning & measuring before building at the end of this article too.
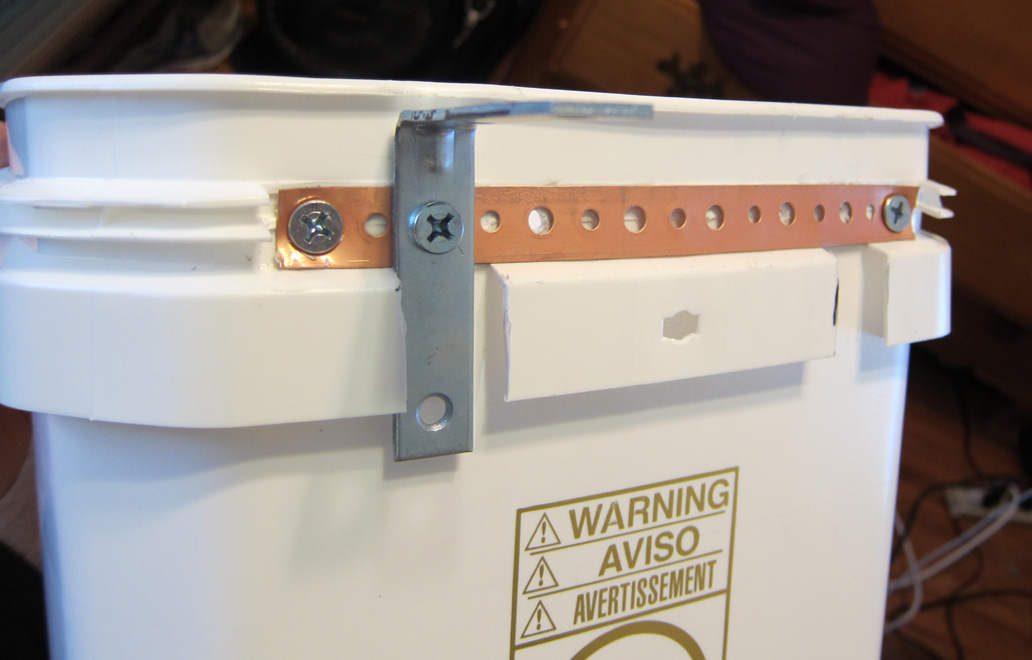 Step 2) From the outside of the bucket, take a piece of strapping and place it over the holes you’ve just drilled. Place your hook over the appropriate hole and put a screw through the hook, strapping, & bucket. Do the same with the second hook on the other side of the bucket.
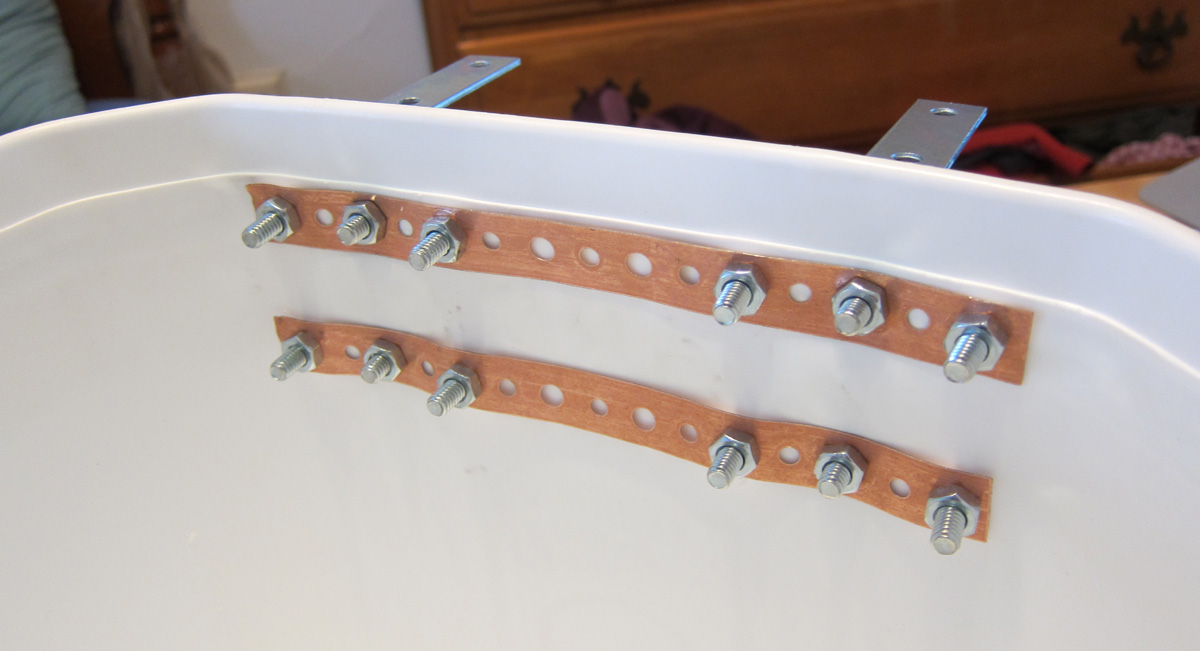 Take a second piece of strapping and place it over the screws from the backside (or inside) of the bucket, using the protruding screws as a guide. Loosely attach a nut to each of the screws to hold the strapping in place. Once everything’s firmly in place, go ahead and insert the supporting screws on either side of the hook, and tighten everything down. Repeat as necessary.
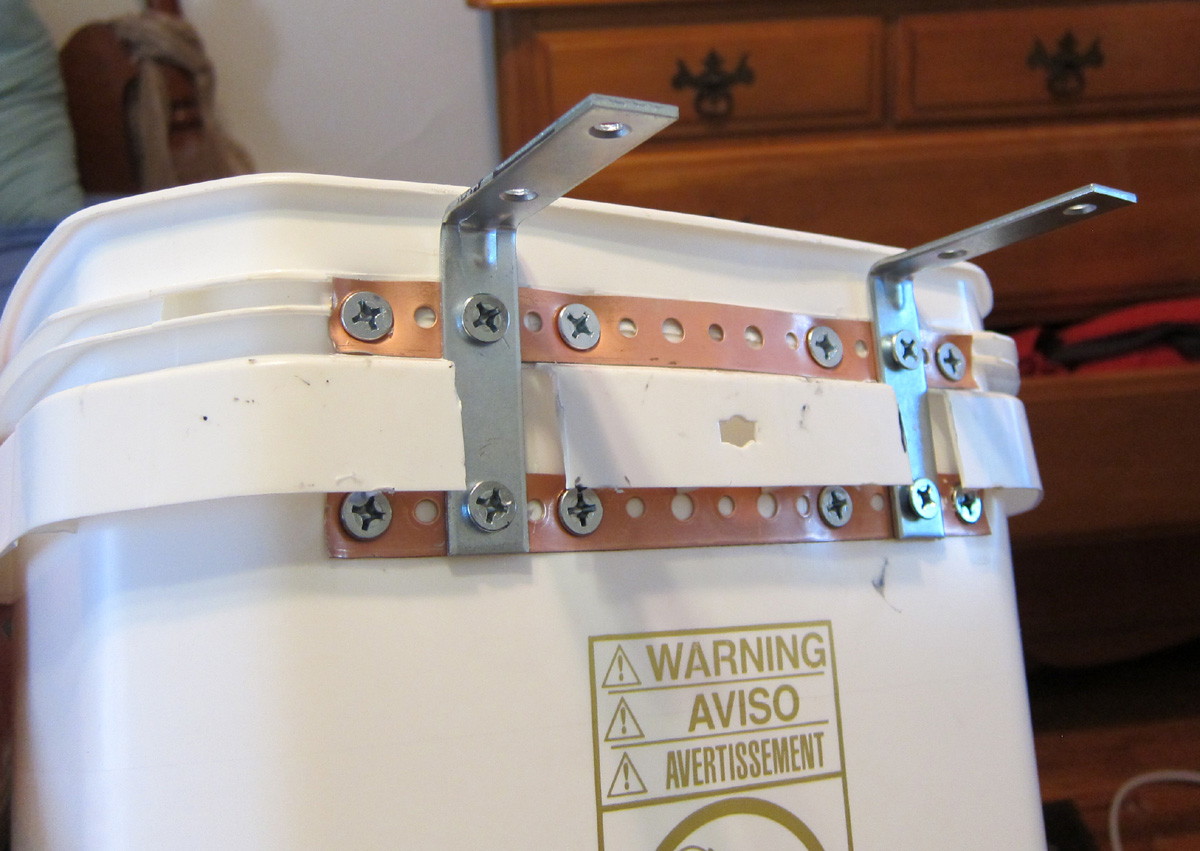
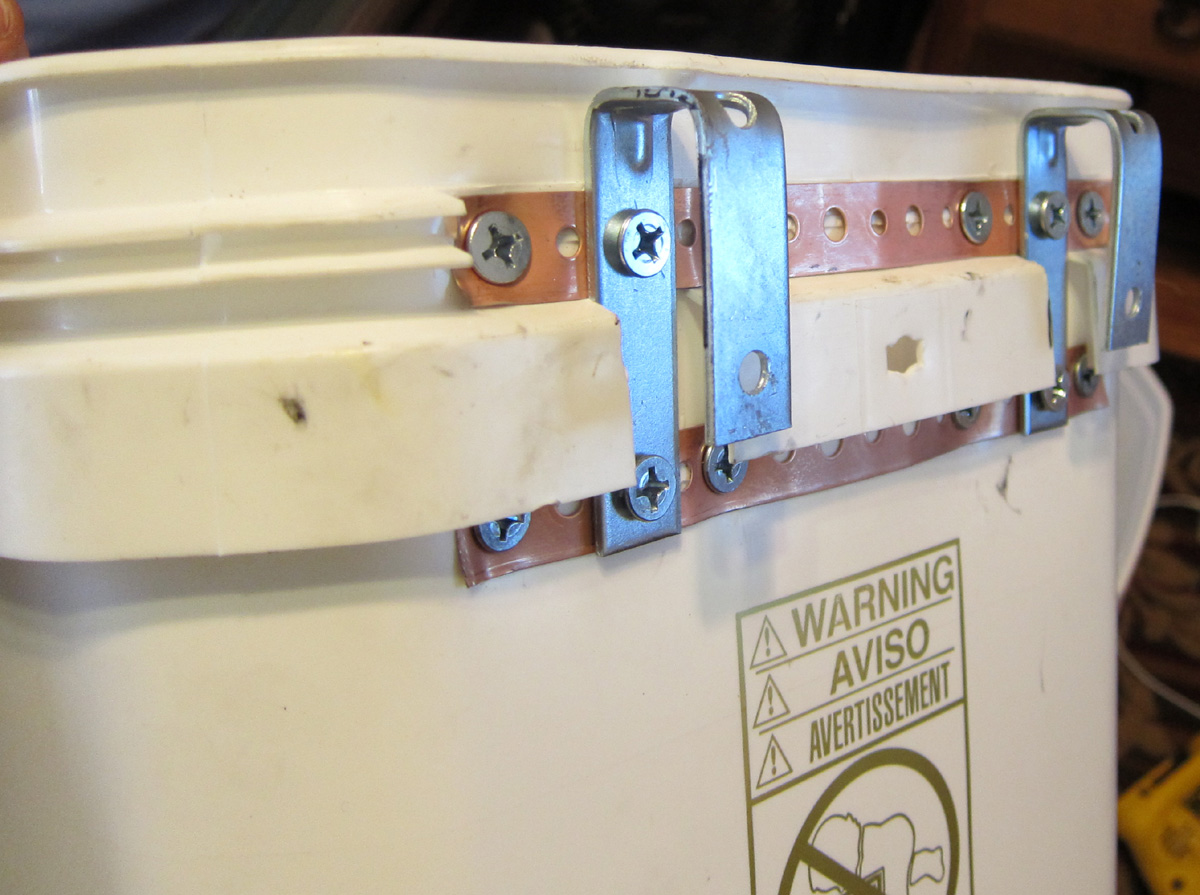
Once you’re all done, it should look something like this. Two hooks attached to the buckets, and the mounting points braced by the pipe strapping, both inside and outside the bucket, and on either side of the hooks.
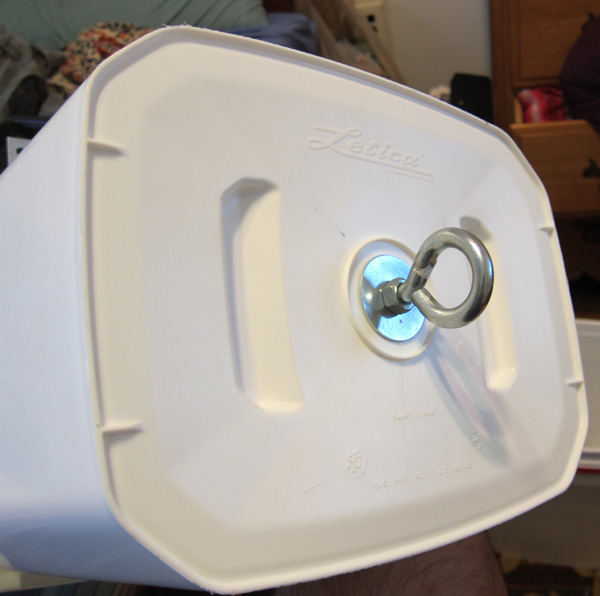
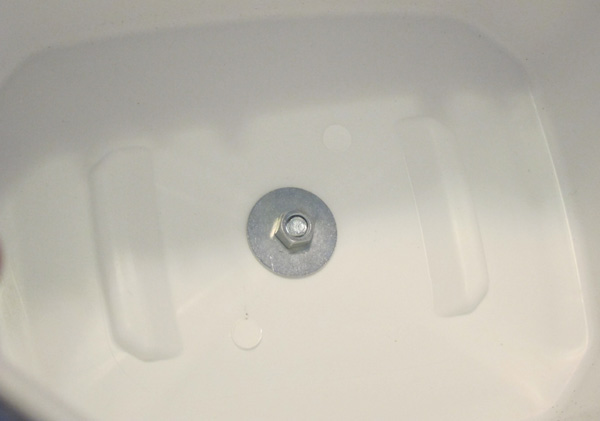
Step 3) Drill a hole for the eye bolt in the middle of the bottom of the bucket. Attach with nuts and washers on both sides of the plastic.
Step 4) Bend your L-brackets to create your hooks.
Step 5) Now we’re ready to mount the buckets to bike rack! Slip the hooks over the bike rack, and run your bungee cords through the eye bolt and hook it to the rack to keep the buckets from bouncing around as you’re riding.
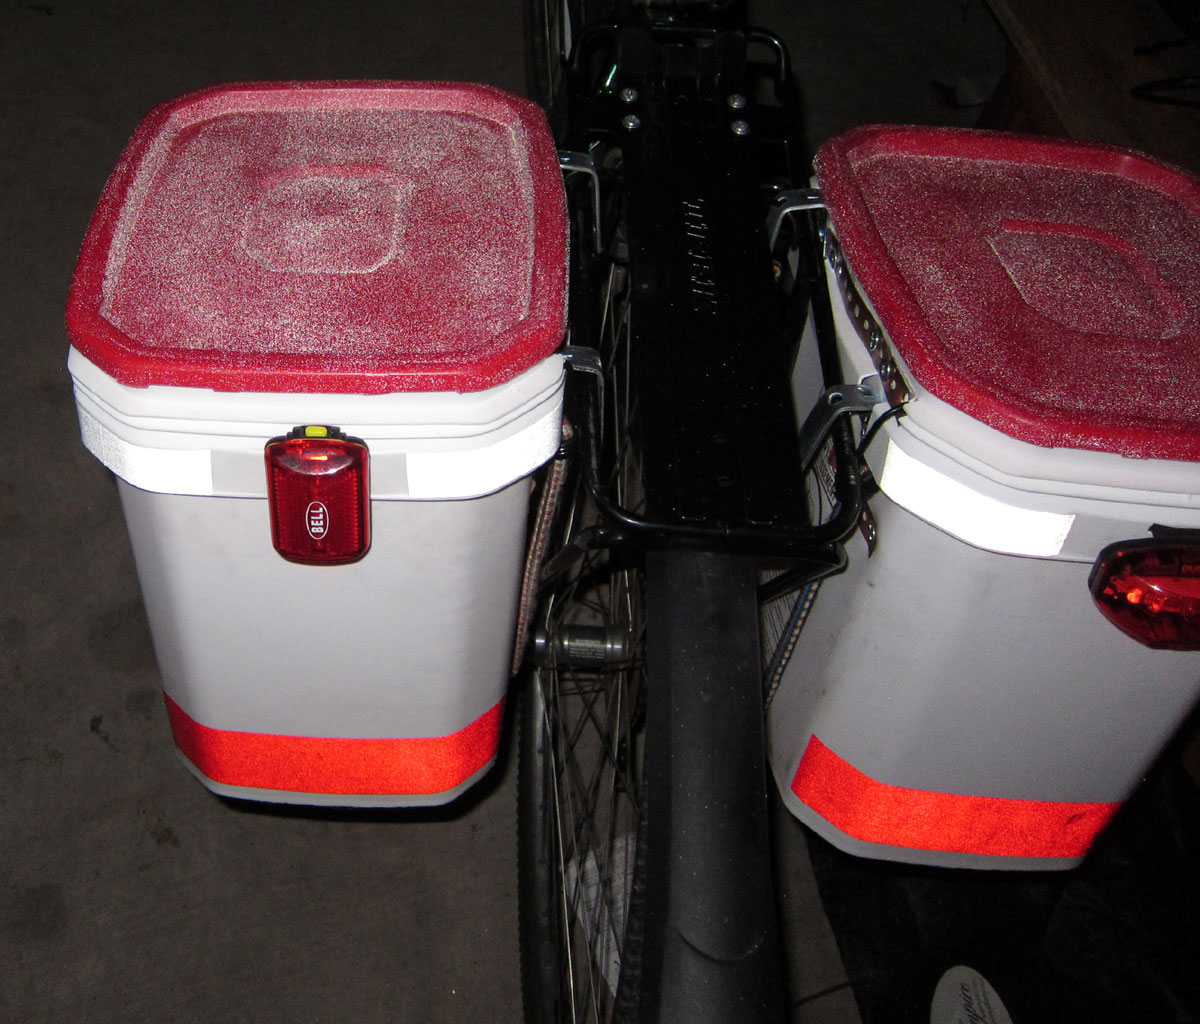
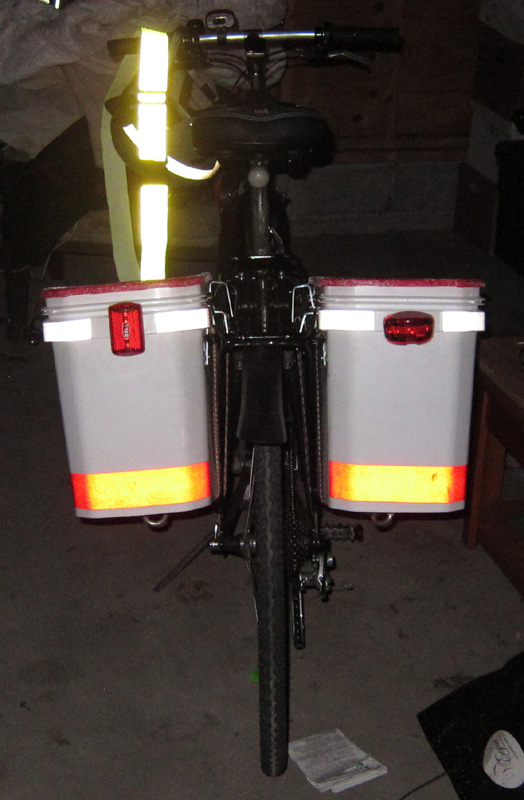
Step 6) Decorate as desired. I used some 3M reflective tape for safety purposes, and repurposed some LED bike lights I already had for night riding. Add some cat stickers or whatever else you’d like to express you special snowflake nature. (The white stuff on the lid is Rust-Oleum reflective spray paint – more on that at the end.)
Post Mounting Experiences
A few things I discovered I hadn’t thought of until after taking the bike out for its first ride:
-
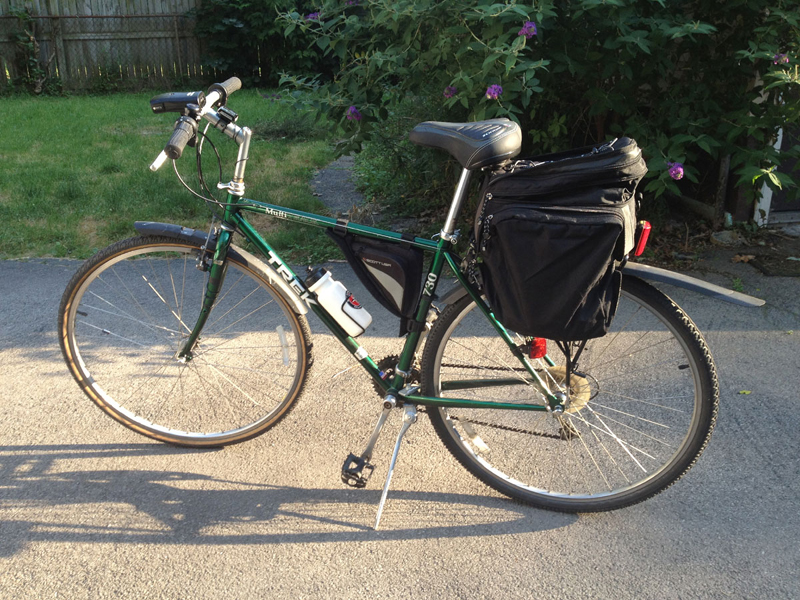
Note the angle of the panniers after modification to allow for better heel clearance. Make sure you have enough heel clearance when mounting the buckets. As pictured, I initially mounted the hooks symmetrically, but found myself catching my heels on the bottoms of the buckets when riding. I tried raising the bike rack, pushing the buckets as far back on the rack as they’d go, but none of it was enough to give me the clearance I needed. I ended up actually re-mounting the rear hook down several inches so that the buckets sit slightly canted. Be sure to take heel clearance into account when planning and measuring out where you want to attach the mounting hardware.
- I bought some Rust-Oleum Reflective Spray Paint, thinking it would add to my visibility at night. I’m not convinced it works all that well, although it does show up in the pictures, and in bright sunlight you can certainly see the sun glinting off the painted surfaces.
- I’m still not convinced the eye bolt and bungee cord approach is the best method for securing the buckets to the bike. My goal is to make the buckets removable in case I need to put the bike in the back of my car or other tight space, but the bungee cords are kind of a pain to get on and off. Here’s an intriguing solution I saw. At this point I’m not sure I want to drill more holes in the buckets. Anyone have any good suggestions?
- Wind resistance is negligible. The only time I’ve noticed any drag is when riding directly into a stiff wind, and even then it’s manageable – just pop down a gear or two like you’re going up a slight incline.
- Lids, I think, are over rated and I wouldn’t spend too much time worrying about them. I mentioned at the beginning of the article that I chose my buckets specifically because they were advertised as having hinged lids instead of the usual snap on lids. It didn’t work once I mounted the hooks, and ended up just removing the hinge mechanism. If it snaps on, it’ll be fine. Beyond that I wouldn’t invest any time thinking about the lids for the buckets. If you are concerned with how you’re accessing the interiors of the panniers, this Instructable looks like an interesting solution.
The Finished Product
All told, the project ran me about $20 for the buckets, $25 for hardware, $40 for the front bike rack, and $15 for miscellaneous other items like the 3M reflective tape and the reflective spray paint. Total work was about a full afternoon’s worth of time, with the largest time consumed trimming excess plastic from the buckets (only stabbed myself with the Exacto knife once!), making adjustments once the panniers were mounted, and struggling through mounting the front bike rack.